Mit dieser Dokumentation könnt ihr nahezu jede beliebige Kamera für Timelapse nutzen.
Folgendes Video diente als Quelle:
https://www.youtube.com/watch?v=KsCaPWgIf5E
Öffne Putty in und gebe folgendes Kommando ein und wähle die 1 (install latest developent version):
wget https://raw.githubusercontent.com/gonzalo/gphoto2-updater/master/gphoto2-updater.sh && wget https://raw.githubusercontent.com/gonzalo/gphoto2-updater/master/.env && chmod +x gphoto2-updater.sh && sudo ./gphoto2-updater.sh
sudo apt-get install libgphoto2-dev
Die Installation kann ein paar Minuten beanspruchen.
Lösche ältere Versionen mit diesem Kommando (optional):
sudo apt-get remove gphoto2 libgphoto2-6 libgphoto2-dev libgphoto2-l10n libgphoto2-port12
Starte den Raspberry Pi neu
sudo reboot
Prüfe, ob eine Verbindung zu deiner Kamera hergestellt werden kann. Kann eine Verbindung aufgebaut werden, so wird dies in Putty wie folgt angezeigt.
gphoto2 --auto-detect
Sollte dies erfolgreich sein, dann wird dies in Putty ausgegeben. Dabei wird der Snapshot auf der Kamera gespeichert.

gphoto2 --auto-detect --capture-image-and-download
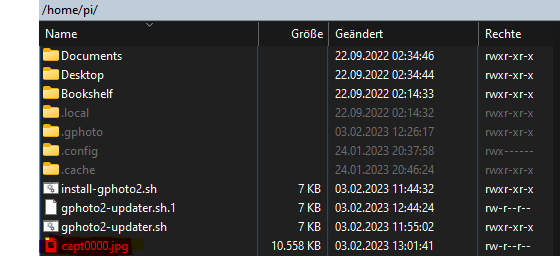
Der Snapshot wird unter /home/pi abgelegt.
Prüfe die möglichen Speicherorte deiner Kamera:
gphoto2 --get-config capturetarget

Ändere den Speicherort auf die Speicherkarte (hier 2)
gphoto2 --set-config capturetarget=2
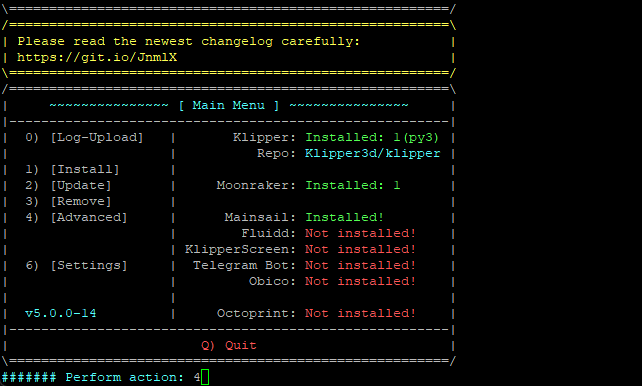
Mit folgendem Kommando wird KIAUH installiert
cd ~
git clone https://github.com/th33xitus/kiauh.git
Die Installation wird über KIAUH vorgenommen.
Zunächst wird Kiauh geöffnet
./kiauh/kiauh.sh
Wähle 4 (Advanced)
Wähle 8 (G-Code Shell Command)
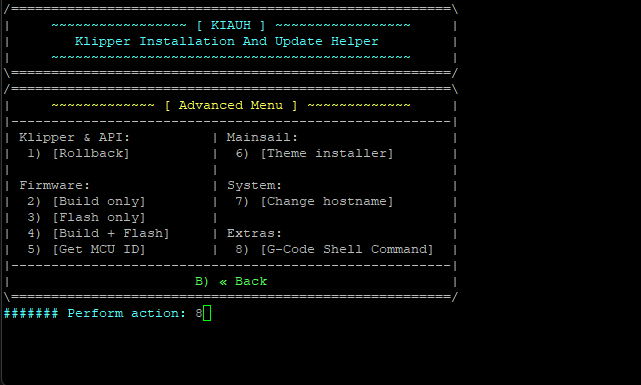
Bestätige mit Y

Bestätige die Frage, ob eine Beispieldatei angelegt wird mit ja.
Schließe KIAUH mit B und danach Q
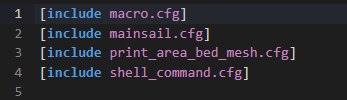
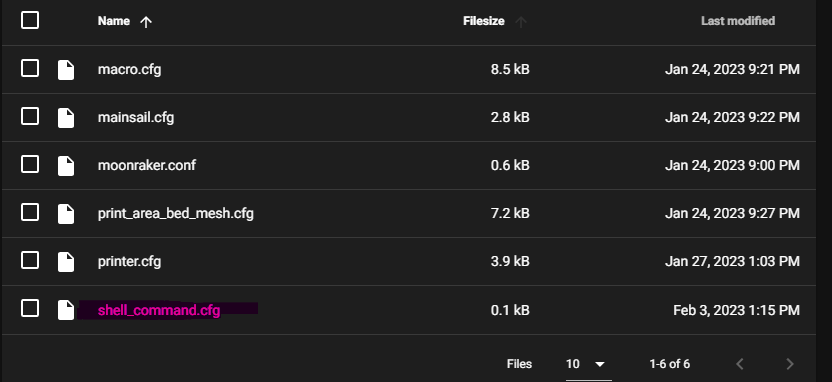
shell_command.cfg
Wenn noch nicht vorhanden, erstelle eine shell_command.cfg Datei
Inkludiere diese Datei in deine printer.cfg
Mainsail Oberfläche
Füge folgenden Code in die shell_command.cfg ein
#=====================================================
# SET CAMERA SAVE LOCATION
#=====================================================
[gcode_shell_command gphoto2_set_config]
command: gphoto2 --set-config capturetarget=1
timeout: 1. ; make sure this is long enough to account for focus time
verbose: False

#=====================================================
# DSLR CAPTURE IMAGE
#=====================================================
[gcode_shell_command gphoto2_trigger_snapshot]
command: gphoto2 --auto-detect --trigger-capture
timeout: 10. ; make sure this is long enough to account for focus time
verbose: False
macro.cfg und printer.cfg
Quelle: https://github.com/EB3DPrinting/Klipper/blob/main/Ender-3Pro%232/macros.cfg
Füge diese Makros in deine macro.cfg ein
#=====================================================
# MANUAL SET CAPTURE TARGET
#=====================================================
[gcode_macro GPHOTO_SET_TARGET]
gcode:
    RUN_SHELL_COMMAND CMD=gphoto2_set_config

#=====================================================
# TAKE SNAPSHOT COMMAND
#=====================================================
[gcode_macro TAKE_SNAPSHOT]
description: Saves current location, moves toolhead to rear of bed, and takes a snapshot before returning.
gcode:
  {% set delayMS = 2000 %} ; Delay after moving and before taking the snapshot, deals with buffering so we don't get the print head in motion
  {% set snapshotPositionX = printer.toolhead.axis_maximum.x / 2 %} ; Middle of bed
  {% set snapshotPositionY = printer.toolhead.axis_maximum.y - 5 %} ; rear of bed w/ some buffer
  {% set currentX = printer.gcode_move.gcode_position.x %}
  {% set currentY = printer.gcode_move.gcode_position.y %}
  {% set currentZ = printer.gcode_move.gcode_position.z %} ; could be used for z-hop which we are not doing in this macro, so it's best to run this in AFTER_LAYER_CHANGE
  SAVE_GCODE_STATE NAME=take_snapshot_state

  {% if printer.extruder.can_extrude|lower == 'true' %}
    G10 ; retract
  {% endif %}

  G90

  G0 X{snapshotPositionX} Y{snapshotPositionY} F5000.0 ;Move to snapshot position

  G4 P{delayMS} ; Dwell for delayMS seconds

  RUN_SHELL_COMMAND CMD=gphoto2_trigger_snapshot

  G0 X{currentX} Y{currentY} F5000.0 ;Return to original position

  {% if printer.extruder.can_extrude|lower == 'true' %}
    G11 ; unretract
  {% endif %}

  RESTORE_GCODE_STATE NAME=take_snapshot_state

#=====================================================
# MANUAL SNAPSHOT TEST
#=====================================================
[gcode_macro GPHOTO_SNAPSHOT_TEST]
gcode:
    RUN_SHELL_COMMAND CMD=gphoto2_trigger_snapshot
Füge diese Sektion in deine printer.cfg ein und passe die Werte an deine druckerspezifischen Werte an
#====================================================================
# FIRMWARE RETRACTION
#====================================================================
[firmware_retraction]
#   The length of filament (in mm) to retract when G10 is activated,
#   and to unretract when G11 is activated (but see
#   unretract_extra_length below). The default is 0 mm.
retract_length: 1
#   The speed of retraction, in mm/s. The default is 20 mm/s.
retract_speed: 35
#   The length (in mm) of *additional* filament to add when
#   unretracting.
#unretract_extra_length: 0
#   The speed of unretraction, in mm/s. The default is 10 mm/s.
unretract_speed: 35

Passe die Werte im Makro TAKE_SNAPSHOT nach deinen Bedürfnissen anTAKE_SNAPSHOT

Es sollten unter der Makro Sektion neue Makros sichtbar sein

Teste mit dem Befehl „GPHOTO SNAPSHOT TEST“ ob deine Kamera auslöst.
Sollte der Fehler „Unknown command: „RUN_SHELL_COMMAND““ erscheinen, dann wurde die shell_command.cfg nicht eingefügt bzw. inkludiert.
Teste mit dem Befehl „TAKE SNAPSHOT“ ob dein Druckkopf zur korrekten position fährt und die Kamera auslöst (vorher muss der Drucker gehomed werden).
Für unter dem Reiter
Printer Settings / Custom G-code / After layer change G-code folgendes Kommando ein
TAKE_SNAPSHOT
Die gespeicherten Bilder können nun zu einem Video editiert werden. DaVinci Resolve bietet eine Möglichkeit. Es gibt aber noch viele weitere Programme wie bspw. Shotcut.